The new mechanical seal must use original spare parts, and the appearance and sealing surface should be carefully checked.
Compare it with the old seal first, whether the size and height are the same, and check whether it is suitable for the shaft and seat;
Then carry out a visual inspection to see whether there is a defect on the surface of the seal, whether the sealing surface is smooth and clean, and whether the material of the spring and spring seat meets the requirements (it must be stainless steel, rust will cause the spring to jam and the seal to fail) to ensure that it is not a refurbished part.
There are two commonly used methods of examination.
First, place the sealing surface of the static ring facing up on the plane, then paste the sealing surface of the moving ring to the static ring, gently rotate the moving ring and press it slightly, and then gently lift the moving ring horizontally to see if the static ring can be lifted.
The second is to place the static ring seal face up on the plane, seal it with butter between the static ring and the plane to ensure water tightness, and then place the movable ring seal face down on the static ring, gently turn the pressure, and then fill the middle of the sealing ring with water. After ten to fifteen minutes, observe whether there is any water seepage between the sealing surfaces of the two rings. If not, it proves that the seal is good. Otherwise, it indicates that the seal is poor and the seal needs to be replaced.
2) Installation of mechanical seals(Twin-Screw Pumps )
The two pump shafts in accordance with the previous mark into the pump housing, the mechanical seal spring seat fixed to the pump shaft, installed spring and moving ring.
The card slots of the spring seat rings must be aligned, otherwise the static ring will be crushed when the end cover is installed.
Then measure the total compression at both ends and adjust the position of the pump shaft to ensure that the compression of the springs on both sides is the same.
Clean and polish the mechanical seal shaft seal seat, and install the shaft seal seat on the end cover according to the mark.
There is a rubber ring seal between the shaft seal seat and the pump end cover, and no gasket is added between them. Adding a gasket will affect the compression of the mechanical seal spring.
Because the pump end cover is positioned against the straight mouth of the outer ring of the shaft seal seat, the end cover should be installed on the pump to see if there is a gap before installing the pump shaft.
If there is a gap, it may affect the positioning of the bearing, which in turn affects the axis of the pump.
Under normal circumstances, such problems do not occur. If there is such a problem, it is difficult to repair it. It is best to replace the pump with a new one.
Install the frame oil seal outside the bearing in place before installing the mechanical seal static ring.
When installing the skeleton oil seal, be careful not to reverse the direction.
Also pay attention to the thickness of the skeleton oil seal.
After the skeleton oil seal is installed in place, the outer ring cannot protrude from the plane, otherwise it may grind to the inner ring of the bearing, causing the bearing to heat up.
After the skeleton oil seal is installed, install the mechanical seal static ring on the shaft seal seat to ensure that it is installed in place.
Make a good end cover gasket, first stick the gasket to the end face of the pump with glue or butter, and pay attention to the thickness of the gasket as thick as the old gasket, otherwise it will also affect the compression of the mechanical seal.
Install the guide rod.
When installing, use a crane to lift the end cover above, and two people below to support it. Slowly push the end cover in along the guide rod until the straight port of the end cover enters the pump body. Then use screws to evenly put the end cover in place.
It should be noted that the guide rod is only used for guiding purposes and cannot withstand the force. The end cover should be supported by the crane.
Be very careful throughout the installation process, otherwise the shaft seal may be damaged.
When both end caps are installed in place, the mechanical seal is installed. At this time, water can be added to test the sealing of the shaft seal.
3) Install bearings
The bearings at both ends of the pump shaft are different, and the input end is usually a combination of two angular contact ball bearings back to back.
The thickness of a double-row angular contact ball bearing is thinner than that of two single-row angular contact ball bearings, so it is necessary to adjust the thickness of the gasket when replacing the bearing.
The reason for using two is to withstand the axial force in the front and rear directions, and also to increase the radial load-bearing capacity.
Due to the high vibration and speed of the pump during operation, bearings are prone to heat generation, so when selecting bearings, we try to choose bearings of the C3 series with relatively high clearance.
This type of bearing has a large clearance and low friction, which can effectively reduce the bearing temperature.
Gear end is a single row cylindrical roller bearing, inner sleeve without edge can be axial swimming.
The twin-screw pump is positioned by the input bearing, so install the input angular contact ball bearing first.
The pump shaft is fixed, measure the distance from the bearing position step of the pump shaft to the bottom surface of the bearing seat, and add or subtract the gasket of the bearing inner ring or outer ring as appropriate.
Then press the bearing tool into the housing bore.
If it is knocked in, the force should be uniform, not too vigorously to avoid damaging the shaft seal.
After the bearing is in place, tighten the locking nut and put the safety piece on.
When installing the bearing gland, pay attention to whether the gland can press the bearing, and if not, add a gasket to adjust.
Do not press the gland too tightly, it will affect the bearing temperature.
After installing the input end bearing, install the gear end bearing. The steps are basically the same. The difference is that after the bearing is installed, the gear is also installed outside the bearing.
First put the gasket back, install one of the gears, tighten the lock nut, and then adjust the gasket between the other gear and the bearing to achieve the separation between the screw teeth.
After the adjustment, tighten the lock nut and put on the safety piece.
Turn the input shaft coupling by hand to easily connect without jamming, indicating that the adjustment is in place, otherwise it needs to be adjusted, and then just install other accessories and the installation is complete.
4) Safety valve repair and adjustment
After removing the safety valve at the outlet of the twin-screw pumps, disassemble and clean it. Check the condition of the spring and the valve seat.
If the spool corrosion is serious, the lathe light car spool seat, and then grinding;
If the spring is seriously rusted, replace it with a new one according to the original size and material.
After the safety valve is ground, the pressure test is carried out in the workshop and adjusted to the take-off pressure value.
5) Hydraulic test
After the twin-screw pump is installed, seal the pump inlet and outlet with a blind plate and conduct a water pressure test. Rotate the pump shaft to check whether there is any leakage in the mechanical seal. If there is no leakage, it can be installed on a gondola.
5. gondola installation
5.1. Preparation before installation
Before hoisting, the following tasks must be completed:
1) Make sure that all the top codes used in the alignment are welded well to ensure sufficient bearing capacity;
2) The base plane and the bottom surface of the pump base are cleaned and polished.
3) All the top code screws on the pump seat are loosened, and the teeth are tapped to ensure
the top code screw can be easily screwed in;
4) The old adjustment gasket removed is ready according to the mark, or make a new gasket according to the thickness of the old gasket;
5) Nylon coupling rod ready;
6) Remove the sewage around the lower part of the pump seat;
7) Prepare the lights;
8) Have the alignment tool ready.
5. 2. Install the centering
The repaired twin-screw pumps is hoisted into place, and the adjustment gaskets of each foot are installed in place, and then centered.
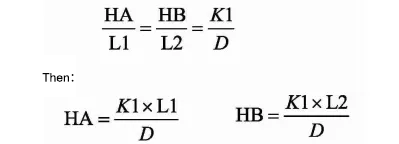
In order to facilitate the calculation, the outer diameter of the coupling is measured first (in order to simplify the calculation, the gauge hand should be as close as possible to the outer circle of the coupling when using the dial gauge to find the plane), the distance between the anchor top code screw and the overshift shaft coupling is L1 after the pump, and the distance between the front anchor jack code screw and the overshift shaft coupling L2 (Fig. 2).
Fig. 2
Use the foot gasket of the adjustment pump to make the center line of the pump roughly aligned, and then tighten all the anchor screws (it must be tightened, otherwise the measured data is inaccurate);
Loosen all the top screws on the left and right, and only adjust the height and not the left and right.
Use a dial gauge to find the plane, make an outer circle, rotate the pump shaft, and write down a piece of data, you can calculate the upper and lower openings of the coupling K1, the left and right openings K2, the upper and lower offsets P1, and the left and right offsets P2.
If it’s an upper opening, then both point A and point B need to be topped high.
The height to be topped at point A is HA, and the height to be topped at point B is HB, then there are:
At the same time, the pump coupling is offset P1, then points A and B
The points should be placed down P1 at the same time, which means that the final AB two points should be at the height of the top:
hA and hB are regular and need to add thicknesses of hA and hB respectively.
The gasket, if negative, is the gasket with the corresponding thickness reduced.
After the high and low adjustment is in place, loosen the anchor screw, adjust the left and right directions according to the above method, then tighten the anchor screw, and use the dial meter to check the midline to see if it needs to be corrected.
Note that at this time, tighten the foot screws, and do not loosen the left and right top code screws.
After the middle line is calibrated, the nylon coupling rod can be installed, and the car can be turned to check whether there is any blockage. If there is no abnormality, the operation test can be carried out.
During the test, the bearing temperature may be too high. As long as it is within the operating temperature range of the bearing and does not rise steadily, the test time can be extended. After the bearing is well run-in, the temperature will automatically drop.
If there are no problems with the test, the installation is completed smoothly.
To provide the best experiences, we use technologies like cookies to store and/or access device information. Consenting to these technologies will allow us to process data such as browsing behavior or unique IDs on this site. Not consenting or withdrawing consent, may adversely affect certain features and functions.
Functional
Always active
The technical storage or access is strictly necessary for the legitimate purpose of enabling the use of a specific service explicitly requested by the subscriber or user, or for the sole purpose of carrying out the transmission of a communication over an electronic communications network.
Preferences
The technical storage or access is necessary for the legitimate purpose of storing preferences that are not requested by the subscriber or user.
Statistics
The technical storage or access that is used exclusively for statistical purposes.The technical storage or access that is used exclusively for anonymous statistical purposes. Without a subpoena, voluntary compliance on the part of your Internet Service Provider, or additional records from a third party, information stored or retrieved for this purpose alone cannot usually be used to identify you.
Marketing
The technical storage or access is required to create user profiles to send advertising, or to track the user on a website or across several websites for similar marketing purposes.